
How to Create a Datamosh Effect in CapCut: Step-by-Step Tutorial for Beginners
Creating captivating video content often involves tapping into glitch and visual effects that evoke a sense of digital disruption. One of the most popular visual trends in recent years is the datamosh effect. This glitch art style intentionally distorts the transition between video clips, creating a surreal, morphing animation that’s eye-catching and hypnotic. If you’re looking to integrate this effect into your videos, you’ll be pleased to know that it doesn’t require advanced editing software—CapCut, a free and user-friendly video editor available for both mobile and desktop, makes it accessible for beginners.
Whether you’re a budding content creator or just experimenting with aesthetic visuals, this guide will walk you through the step-by-step process to create a datamosh effect in CapCut. Done right, the effect can bring dimension and a futuristic feel to your creations.
Contents
- 1 What is Datamoshing?
- 2 What You’ll Need
- 3 Step-by-Step Tutorial: Creating the Datamosh Effect in CapCut
- 3.1 Step 1: Open CapCut and Create a New Project
- 3.2 Step 2: Trim and Align Your Clips
- 3.3 Step 3: Add a Freeze Frame to Create Motion Persistence
- 3.4 Step 4: Import and Overlay the Next Clip (Clip B)
- 3.5 Step 5: Add and Adjust the Glitch Effect
- 3.6 Step 6: Blend and Fine-Tune
- 3.7 Step 7: Render and Export Your Video
- 4 Tips for a Better Datamosh Effect
- 5 Common Mistakes to Avoid
- 6 Final Thoughts
What is Datamoshing?
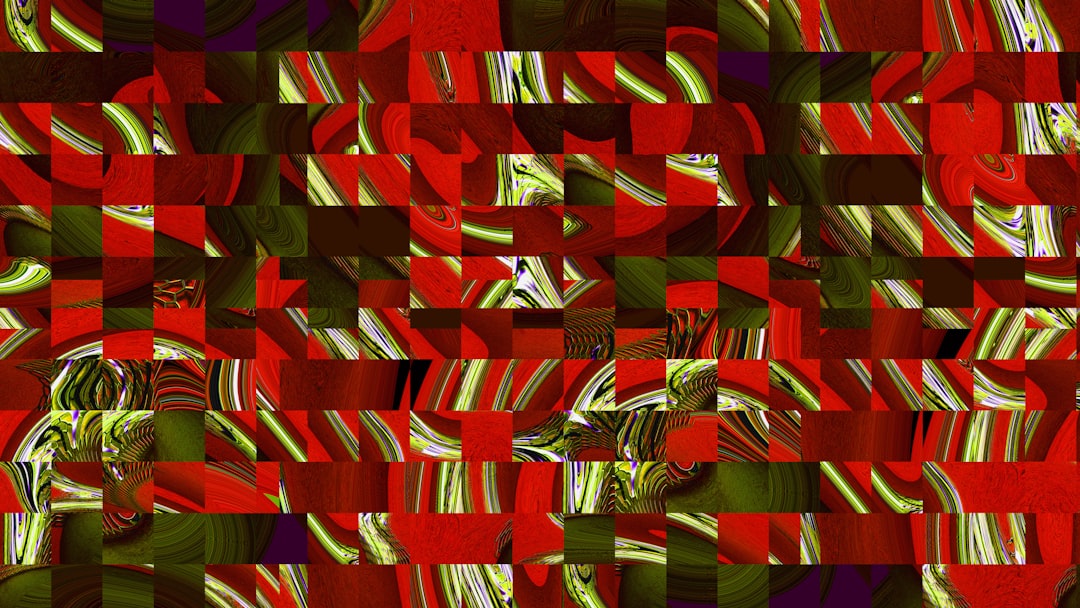
Before diving into the tutorial, it’s essential to understand what datamoshing is. Datamoshing is a video editing technique where transitional frames between two clips are removed or distorted, causing pixel blocks (called macroblocks) from one scene to bleed into the next. This creates a trippy, almost psychedelic movement as elements from one frame drift into another unnaturally.
Originally, this effect was achieved using complex editing software such as Adobe After Effects or even manual file corruption methods. But with modern tools like CapCut, you can achieve a similar look without diving deep into code or advanced editing.
What You’ll Need
- CapCut App: Install CapCut from the App Store or Google Play. Desktop users can download from the official site.
- Video Clips: At least two video clips you’d like to blend using the datamosh effect.
- Creative Mind: A touch of creativity goes a long way in determining where and how to apply the effect.
Step-by-Step Tutorial: Creating the Datamosh Effect in CapCut
Step 1: Open CapCut and Create a New Project
Open the CapCut app and tap on New Project. Select your video clips. It’s best to use two clips with movement or distinct visual change between them, which will accentuate the datamosh effect.

Step 2: Trim and Align Your Clips
Once your clips are in the timeline, carefully trim them to ensure that the transition happens exactly where you want the glitch to occur. The cleaner your cuts, the more intentional the datamosh effect will look.
Make sure Clip A ends exactly where Clip B begins. Overlapping transitions or faded cuts don’t work well for this type of effect. You want a hard, sudden shift from one clip to the next.
Step 3: Add a Freeze Frame to Create Motion Persistence
This step is key to mimicking the datamosh look. Follow these instructions:
- Select the last frame of Clip A on the timeline.
- Use the Split tool to create a small duplicate section.
- Select this short section (1–2 seconds) and tap on Freeze from the editing menu.
The freeze frame creates a stationary point of reference that the next clip’s motion will distort. It acts as a base layer, tricking the eye into blending flows from Clip B into Clip A’s still frame.
Step 4: Import and Overlay the Next Clip (Clip B)
Now, insert Clip B directly after your freeze frame. Use the overlay feature rather than replacing it directly, which gives you more flexibility and a stronger glitch illusion.
To do this:
- Tap on Overlay.
- Choose Add Overlay and import Clip B.
- Resize and align Clip B directly above the freeze frame.
Step 5: Add and Adjust the Glitch Effect
Now comes the magic. CapCut has a built-in glitch effect that we can tweak to emulate a datamosh. Here’s how to apply it:
- Select Clip B in the overlay layer.
- Tap on Effects from the bottom menu.
- Go to Video Effects > Glitch.
- Choose an effect like RGB Split, Error, or Distortion.
Adjust the intensity, speed, and duration so that it matches the transition zone. With a bit of experimentation, you’ll be able to simulate that melting or morphing appearance that datamoshing is known for.
Step 6: Blend and Fine-Tune
To complete the effect, tweak the opacity levels and use masking tools under the overlay settings to create smoother or more chaotic transitions. Lower the opacity slightly to show both the freeze frame and the glitch video beneath.
You can even stack multiple overlays with different glitch settings to exaggerate the effect. Try rapid cuts or jittery movements to enhance the feeling of digital dissonance.
Step 7: Render and Export Your Video
Once satisfied with the effect, tap the Export icon in the top right corner. Choose your desired resolution and frame rate. For social media, 1080p at 30fps is more than adequate. CapCut will process your project and save the final cut to your gallery or camera roll.
Tips for a Better Datamosh Effect
- Use Motion-Rich Clips: The datamosh effect shines with clips involving significant movement or rapidly shifting colors and shapes.
- Optimize Color Contrast: High contrast between the two clips makes the glitch trail more noticeable and visually interesting.
- Keep Duration Short: Limit the effect to a few seconds—overuse dilutes its impact.
- Experiment with Effects Layers: Combining different visual filters and glitch presets can create a more complex and original look.
Common Mistakes to Avoid
- Using Fade Transitions: The datamosh effect relies on abrupt cuts, so avoid using crossfades or soft transitions.
- Ignoring Frame Alignment: A poorly-timed transition can break the illusion. Use frame-by-frame editing if necessary.
- Overloading Effects: It might be tempting to stack multiple glitch filters, but subtlety often results in a more professional look.
Final Thoughts
The datamosh effect may have originated from data corruption techniques, but in the modern video editing world, it has evolved to become a creative and stylistic tool. CapCut’s intuitive platform allows even beginners to replicate this complex visual with ease and precision.
By following this tutorial, you’ll be empowered to experiment with glitch aesthetics, unlock creative expression, and bring a new level of intrigue to your video content. Whether used subtly in cinematic edits or boldly in social media clips, the datamosh effect adds an edge that captures attention and sets your work apart.
Keep refining your approach, and with practice, you’ll soon master this visually arresting technique—and perhaps even develop your own signature glitch style.